10 Steps To Publish An Android App On Google Play Store
-

Maharshi Pancholi
Smartphones have become one of the most go-to gadgets for almost every user in the world. It’s increasing usage has led mobile apps in expose app businesses to a significant marketplace.
| A recent study states that over 60% of people sleep with their phones by their side and check it first thing in the morning.|
Apps are more than just a business expenditure. It will affect your business’ visibility across a variety of markets and allow you to gain a vast audience by generating more conversion rates and creating buzz around your application.
But, even if developing an app is no less than moving a mountain, it’s still a half-battle won. The other half is to get the company app up and running in the Google Play store.
How To Submit App To Google Play Store
The app market currently contains 2.89 million downloads. Android users had a choice of 3.48 million apps as of the first quarter of 2021, making Google Play the app store with the most available apps. This demonstrates why the Play Store for Android is a fantastic place to submit your app.
We’ve put up this blog to help you know about Google Play uploads from beginning to end. Let’s get started with Google Play publish without further ado.
Make sure you follow each step!
Step 1: Create a Google Developer Account
- Start with registering a Google Developer Account to publish your app on the Play Market.
- You may come across a developer dashboard and a Google Play console(backend controlling center). It enables developers submit Play Store apps for Android.
- Open an account by paying a one-time fee of $25. You can upload Google Store Play apps for free after paying this one-time cost.
- When creating an account, you need to sign the Google Play Developer distribution agreement and provide all of the requested information,. It may take up to 48 hours for your account to be approved once you submit it.
Step 2: Create a Google Wallet Merchant and link it to your Developer Account
When the app gets uploaded into the Play Store it will require a merchant account. It aids in the planning of paid app sales or in-app purchases. You can control app sales and monthly payouts, as well as view sales reports, from there. All you need to do is follow the steps.
- Go into the menu and select Report
- Pick Financial Report
- Click here for merchant account setup
- Add your information
- Please complete your submission
- Merchant accounts have a connection to the Developer accounts
Step 3: Prepare the Documents
Paperwork is often very demanding and is particularly necessary for legal documents. Based on our experiences, we would suggest preparing end users’ license agreements (EULA) and privacy policies before we start. You can make your own from similar apps, or you may ask your lawyer for all this work from scratch. The EULA is a contract between you, the product’s owner, and the users of your product. In a nutshell, it includes:
- What users are permitted to do and what they are not allowed to do
- The app Licensing fees
- Information on intellectual property
Terms and Conditions, describe what services you provide to users and how you want them to respond. Although Google does not require you to publish your Terms of Service, it is a good idea. For example, you can combine the Privacy Policy and Terms of Use chapters into a single document.
Privacy Policy includes:
- A detailed list of personal data. It is collected, stored, processed and used by the app
- Technical information about the device is compiled and installed in the operating system
- The app’s functionality is both paid and free
- Company registration location or the address of the copyright holder of the application
- The legal system and legislation will settle disputes and regulate legal relationships.
- Subscription conditions
- Users of the vast majority of app users, as well as age and the existence of certain content
Step 4: Study Google Developer Policies
Once you have the product idea in place, it’s time for all the features to follow the Google development policies. This document describes the process for developing and marketing apps to meet the high-quality standards of the store.
When Google decides that a particular product violates a specific policy paragraph, it could be blocked or removed. Additionally, repeated violations may result in a developer’s account cancellation.
As a result, carefully review all of the available information on:
- Restricted content description
- Listing and promotion of the store
- Intellectual property and impersonation
- Advertising and monetization rules
- Regulation of privacy, security, and deceit
- Spam and the bare essentials
Google’s regulations are continuously changing, so it’s critical to keep track of them and stay current even after your app is out.
Step 5: Technical Requirements
Before proceeding with the upload, make a few essential checks: package names must be compatible throughout the application’s life cycle. You can change this after the distribution. For example, you could specify package names for application files. Each application needs to have its digital sign with developer certificates. This certification can not be used for other purposes, and it identifies the author of an app. Finally, Google limits the download size to 100MB on the newest versions of Android 2.1 and above.
Bundle Identification Number
A good package name for your application should be specified. After the distribution, you can’t change it. The package name is set in the manifest file of the application.
With a signing certificate, you can release a signed app
A developer’s certificate should be used to sign each app digitally. The certificate identifies an app’s author and cannot be duplicated.
Size of the App
Google imposed a file size limit of 100MB for Android 2.3 and higher (API level 9-10, 14 and higher) and 50MB for Android 2.3 and lower.
You can always use APK Expansion Files if your app exceeds this limit.
The File Extensions
Google accepts two different release formats: app bundle and.apk. .aab, on the other hand, is the preferable extension. You must first join up for Google Play’s app signing service to use this format.
In the Developer Documents, Prepare for the Release guide, you learn more about android app file technical requirements.
Step 6: Using the Google Console to Create the App
You now have a file that is ready to be uploaded. Let’s get started by making a new app in your Developer Account:
- Go to the menu and select the All Applications tab.
- Choose Create Application now.
- From the drop-down option, select the app’s default language.
- Include a brief KT of the app
- Select Create
After that, you’ll be led to the store entry page, where we’ll fill in all of the app’s details.
Step 7: Store Listing
Let’s start by preparing the store. It contains helpful valuable information for app store optimization and offers user details of an application before a download. This mandatory section has a *. You may require some design and copy-writing effort, so you need to make some preparation beforehand.
Alternatively, you can create up to eight pictures. Choose the apps with the most valuable features and value.
- Product Description
The file contains a name for the app (up to 50 symbols), a short description (up to 82 characters), and full descriptions (over 4000 symbols). Keep control over your keywords.
- Screenshots
You have the option of adding 2 to 8 screenshots. Choose the ones that best demonstrate the app’s functionality and value.
The requirements are the following:
- JPEG or 24-bit PNG (no alpha)
- From 320px to 3840 px
- The long side to the short side ratio should be 2:1
- Icon
The requirements are the following:
- 512px by 512px
- 32-bit PNG (with alpha)
- Maximum file size: 1024KB
- Feature Graphic
It’s a medium to promote that may be found on the Play Store in various places, including the homepage.
The requirements are the following:
– JPEG or 24-bit PNG (no alpha)
– 1024px x 500px
- Promo Video
You may include a link to your YouTube account if you have any promotional videos. On the app’s page, this movie will appear before the screenshots.
- Tags
For improved ASO, select the most relevant keywords to your app from the list. Unfortunately, there isn’t any way to add your tags.
- Localization
If your app supports many languages, list them all and include translations of its content. It is strongly advised that you provide localized screenshots and graphics.
- Application Type and Categorization
To begin, select the application type from the drop-down menu: game or app. Then select the category to which your app belongs. After uploading your APK to Google Play, you may also include a section for users to rate your content.
- Contact Details
Here, you should provide the support service contacts. By filling in the website URL, email, and phone, you make it easier to contact you if necessary.
- Privacy Policy
Select the application type from the drop-down menu: game or app. Then select the category to which your app belongs. After uploading your APK to Google Play, you may also include a section for users to rate your content.
Step 8: Content Rating
Depending on what the Review says, the app may not get the coveted rating from Google Play Stores. Choose an app from the Console Playlist and choose Store Presence from the menu. Ratings help attract a relevant audience to the application. You can always provide the correct information in a report. A false rating can be dangerous for a user but could even result in a Google app’s suspension or removal.
- The Content rating should be accessed through a menu located in the upper part of the page. In the ‘Continuation’ tab, click the ‘Continuation’ button.
- Now it’s time to fill out a questionnaire. Alternatively, select Save Questionnaire once you complete the survey.
- Pick the Calculated Rating option to get a detailed report from PlayStore.
- In the end, click on Apply Rating to confirm the rating and move forward with the pricing & distribution plan.
Step 9: Pricing the Application
You can get your app for free. The Android apps in the Playstore are paid for and can be upgraded from free to paid later. Make sure to select a reasonable model of pricing if possible. Next, choose which countries where your apps are going. You can choose any country or select a particular country as your app distributes. There will also be a choice to install specific Android apps and devices.
In the Pricing and distribution section, you need to fill in the following information:
- Regardless of whether your app is free or paid,
- Where will the app be available? (choose the countries from the list)
- Whether your app will only be available on specific devices
- Is the app acceptable for children under 13 because it contains sensitive content?
- Whether or not your app contains advertisements
Remember that you can switch from a paid to a free app later, but not the other way around. So you’ll have to create a new app if you plan to distribute it for a fee later.
Step 10: Upload APK and Send for Review
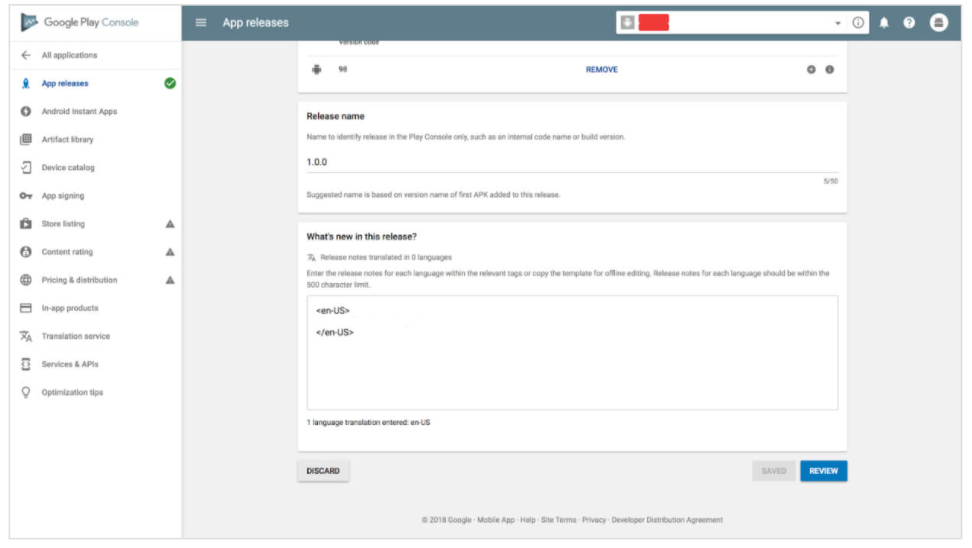
Finally, you’re ready to share your app with the world! It’s going to be a fantastic moment.
Now we must use files such as APK and App bundles, sign app releases and download these to your applications. So: Navigate to ‘Release Management’ then the app release tab.
The final release can be a single release. Once you decide to release something, you can click on Create Release. You will now be directed to our New product pages. Again, you must decide whether or not to sign up for the Google Play store.
- Let’s proceed to the left panel’s App Releases area. You’ll find three publishing options here: Production, Beta, and Alpha tracks.
- Keep using the Alpha or Beta versions. In this instance, your app will not be available to everyone on the Play Store after it has passed the review process.
- The Alpha version is designed for closed testing and is only available to individuals who have been invited to participate as testers. Anyone can participate in your beta testing program and provide comments to you.
- Pre-release testing helps you get feedback, test your app with a larger audience, and address bugs before releasing it to the general public.
It’s worth noting that if you decide to alter the Alpha or Beta version to Production later, you’ll have to go through another round of evaluation.
After you’ve decided on the sort of release, go through the following steps:
- Select Manage (Production/Beta/Alpha) from the drop-down menu
- Select Edit Release
- APK or app bundles can be uploaded
The release’s title will be automatically added. In addition, you can remove the text from what’s new in this release area for the first time.
To validate the modifications, click Review and press Start rollout to production to send your app to the review.
Don’t be concerned if you miss to include something. Google will show you the directions and advice along the route. However, if something crucial is overlooked, you won’t send the app to the evaluation.
Keep in mind that there is no way to establish a manual published in the initial edition. The app will be launched as soon as the Review is completed. It usually takes up to two days. According to Google, the review process might take up to a year.
How Can I Get My App Featured In The Play Store?
Your role is to ensure that this app is widespread and that thousands download it. It’s now time that the Apps are available on the Play Store. It is a practice that helps you get noticed by introducing your website or service in a new way, i.e., using new technologies. In addition, it will help you gain more user engagement by improving Google PlayStore apps and increasing their visibility for your product by more than onefold.
What Should You Do After Your Play Store App Is Accepted?
How can a developer publish an application on Playstore? Okay, we cover it. But, first, list the ways your application is positioned globally by Google.
Initiate Press-Release
Press releases are another means of marketing your products. It will make your brand recognizable, and much media coverage of the app release can help your app reach a wider audience. The press release, which explains the words, attributes, and insights of android app development teams, demonstrates an excellent app marketing strategy. This will be a perfect example of the user getting good results.
Promote App On Social Media
Social Media will increase the popularity of your application exponentially. Its popularity is a good thing as social networking has an effect. Various social media sites like Facebook, Instagram, LinkedIn, Pinterest, and others remain active. Promoting apps on these platforms will also help drive more traffic and hopefully more downloads.
Focus On App Maintenance And Updates
You can upload software to an app store for free. You should keep your application running as quickly as possible and update the application frequently, addressing the problem and bug. It’s not a one-day activity to do something. Keep the app updated and do any necessary workarounds.
Practice ASO
Appstore optimization is a widely recognized process for Android apps. Originally named AOO, the activity focuses on the aspects of the product that can increase your app’s visibility in the AppStore. In addition, this strategy will increase impression conversion into downloads.
Wrapping Up
We hope these instructions will help you get through the publishing process efficiently, and soon the Play Store users can download your exceptional app.
But remember that the journey does not stop at publishing. Running a mobile application requires continuous efforts to get it trending; otherwise, competition will overshadow the app.
FAQs
We process and release updates to our current applications as quickly as feasible. Standard publishing methods will be used by default for your app. In rare situations, some applications may need more time for approval, which might be up to a week.
A Google Developer Account is required prior to uploading an app to the Google Play Store. You’ll pay a one-time $25 cost when you release your first app. Once you do, all of your future Android app releases will be free on the Google Play Store.
Sign in to your Google Play developer account https://play.google.com/apps/publish. To see app pricing, click on your app in the list, then choose Monetize in the left-hand menu. To set a price for your app, go to the App Pricing page and choose the “Make your app paid” button.
In-app advertising is the way to go for Google Play to make money. It’s the most common and lucrative method of making money off mobile applications. Displaying banner advertising and generating clicks is a simple and effective way for developers to earn $1,000 or more monthly.
Related Articles
-
 Is iOS for sales and Android for greater market reach?
Purchase behavior on Androids and iOS lead to one conclusion. If you are looking at selling a product – iPhone development is for you. If you are looking at a
-
 Mobile Application: Fantastic Four Reasons Your Business Needs It!
In this monetary age, where people care about nothing, but earning more, everyone is busy in his own life and so are you! In such a situation, you are not
-
Benefits Of Collaborating With Android Development Companies For Android 14 Enhancement
The best thing about technology is that it evolves and gets better with time. This becomes more evident when you look at modern mobile technologies that have been evolving fast