Convert HTML Website to WordPress Theme Based Website [Updated]
-

Saumil Kalaria
![Convert HTML Website to WordPress Theme Based Website [Updated]](https://www.brainvire.com/blog/wp-content/uploads/2021/05/Convert-HTML-to-Wordpres-1024x573.jpg)
In this software-driven age, developing a website has become extremely seamless.
But, was it always like that?
No. Earlier, you were supposed to have a little knowledge of coding or otherwise, this whole process of web development was a catch-22.
Thanks to the software scientists who introduced website templates, software applications, and most importantly, profound content management systems; mainly WordPress, which made website design and development a lot easier than ever. We no longer have to write markup ourselves, content management systems can very well, take care of it.
But what to do if the site was designed years ago? Or it is a static HTML website( which by the way still exists).
You need to update your website via HTML coding.
But this process is cumbersome and ridiculously time-consuming.
How about scrapping the entire website and building it from scratch?
If such ideas are popping up in your head, we are here to do the thinking.
In the above-given situations, you can convert your old HTML site code into a WordPress website. Or if you have a static website, you can move it to WordPress.
Now the question is, how?
For this, there are various advanced coding methods as well as some highly convenient plugins, which we will be exploring in this article.
Why do you need to convert HTML to WordPress Theme?
If you count only the CMS-built sites, then 64.1% of those are WordPress. WordPress allows everyone to use it, regardless of enough coding knowledge. You won’t need to hire WordPress developers for development or updations as they are super simple.
Converting your HTML static website to WordPress will allow you to manage it quite easily.
[Also Read: Experience an Exponential eCommerce Growth with WordPress Website]
And If you’re someone who is not quite familiar with website coding, hiring a WordPress developer and utilizing wordpress design and development services for revamping your site would be a feasible option.
Also, if you want to rank higher in google search engine results, you’re going to need to update your site consistently.
But what does it mean to convert your existing HTML website into WordPress?
When we say that an HTML site needs to convert into a WordPress website, it means taking your existing data from your existing static HTML site and transferring it into a WordPress theme.
Below are a few ways to convert from HTML to WordPress and how to execute each of them.
Main 3 methods to convert HTML to WordPress
1. Manually Convert HTML to WordPress Website
Manual conversion is said to be the most technical option of all. This is why it is not recommended for all, and if you go with this option, make sure you have prior coding experience. You should be a little familiar with the web technological languages such as HTML and CSS, PHP, etc.
The manual conversion uses the HTML code from your existing site as a starting point.
Here is a step-by-step guide to manual HTML/WordPress conversion:
Step 1: Create a New Theme Folder
First things first, create a new theme folder on your desktop, which is like your directory folder on your computer. It serves the same purpose.
Next, go to the code editor and create text files. You would need to create five different files:
- Style.css
- Index.php
- Header.php
- Sidebar.php
- Footer.php
Step 2: Copy CSS Code
Now, copy the entire CSS coding from the website you need to revamp, onto a WordPress Style Sheet.
Before that, prepare the WordPress style sheet, which is nothing but the style.css file you created in the last step.
Copy and paste the CSS code from the current site’s source to the style sheet.
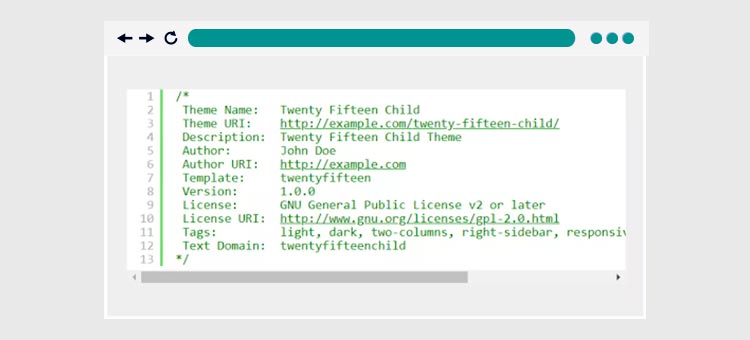
Now fill in the different parts of the style sheet header for your new WordPress theme.
They are:
- Theme Name – Whatever you want to name it
- Theme URL – The site address
- Author – Your name
- Author URL – Link to the homepage that’s being built
- Description – A brief description of the theme that is present in the WordPress backend(this part is optional)
- Version – Start with 1.0.
- License, License URL, Tags – if you submit the theme into the WordPress directory for others to use, then only this part comes into play.
It will look something like this:
After the header, copy and paste the existing CSS from your static HTML website to your new theme folder and close it.
Step 3: Separate Existing HTML
WordPress usually uses PHP to pull database information. As a result, you need to break your HTML into multiple pieces so that the CMS can bind them together in a proper manner.
This may look complicated but it is just to copy parts of the original HTML document into several different PHP files.
Now, open your index.html file.
Copy the code from the WordPress files and paste it into the following areas listed below:
- Header.php – Anything from the beginning of your HTML code up to the main content area falls under this category. You’ll have to copy and paste <?php wp_head();?> right before this designated section </head>
- Sidebar.php – This is where you’ll paste all of the code from the portion marked as <aside>
- Footer.php – This section runs from the bottom of the sidebar and goes up to the end of the file. <?php wp_footer();?> should be called before using </body> to close the bracket.
After completing that, close the “index.html” file and save your other data to the theme folder.
Close all of the files and just keep header.php and index.php open.
Step 4: Change the Header.php and Index.php Files for WordPress
Now, change header.php and index.php so that they are compatible with WordPress’s format.
To perform this, search for the link in the <head> section similar to this:
<link rel=”stylesheet” href=”style.css”>.
Replace that link with this link:
<link rel=”stylesheet” href=”<?php echo get_template_directory_uri(); ?>/style.css” type=”text/css” media=”all” />.
Next step is to save and close the header.php file.
Open your index.php file. It does not contain anything right now.
Enter the following in this manner:
<?php get_header(); ?>
<?php get_sidebar(); ?>
<?php get_footer(); ?>
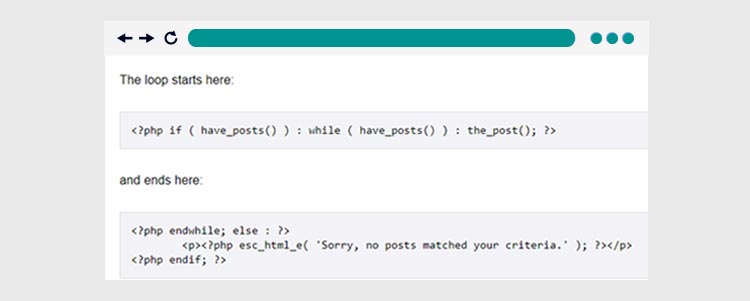
Don’t forget to put space between the first and second lines of code. You will paste your Loop code in that space. WordPress uses this PHP form to display posts:
Save and close the file. Prepare the basic theme and add it to a WordPress site.
Step 5: Screenshot and Upload
Lastly, take a screenshot of your theme, of about 880×660 pixels and upload it. The screenshot is for the WordPress backend. It will act as a preview of your site. Save the file as a screenshot.png and add the screenshot to your theme folder.
Now upload the theme to WordPress. Follow the following steps:
- Create a zip file.
- Go to WordPress and select appearance, themes, and click add new at the top.
- Select upload theme and upload the zip file
- Click Install Now.
Now, activate the theme.
2. Converting HTML Through a WordPress Child Theme
This form is easier and very cost-effective to use than the first. It enables you to use thousands of existing WordPress themes while keeping your original design intact.
This is accomplished by employing a child theme. These themes are constructed on top of the parent theme and don’t stand alone; instead, they change the parent theme to meet your needs.
Step 1: Select a Theme
Pick a theme from the WordPress theme directory. You can select any theme from their wide range, keeping in mind that it resembles your existing design.
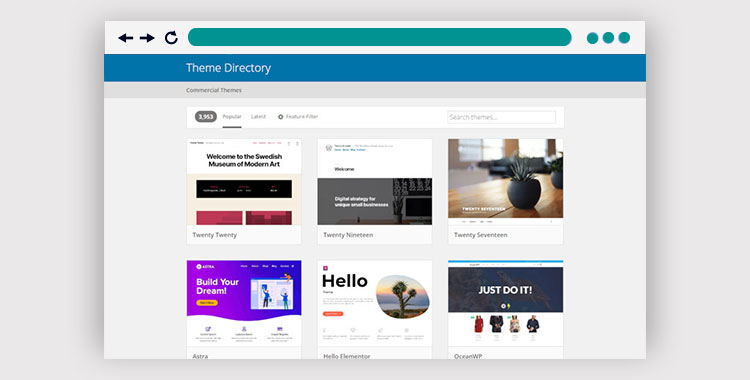
The next step here is to install the theme on your WordPress site but don’t activate it.
Step 2: Create a New Theme Folder
Remember you created a new folder on your computer in the previous method. You’ll be doing the same here.
Keep the same name of the folder as that of the parent theme and add “-child” at the end of it. Make sure there are no extra spaces in the name.
Step 3: Create a Style Sheet
This step is the same as the one we did in the previous method to create a style sheet.
Now, add a tag called “template.”Ensure that the name of your parent theme is included. As that is required for the child theme to function.
Step 4: Create a Functions.php
Then, for the child theme, you’ll build a functions.php file and inherit the parent styles.
Create a new file and name it as functions.php. Make sure you start it off with <?php.
Now, add this code written below:
function child_theme_enqueue_styles() {
$parent_style = ‘parent-style’;
wp_enqueue_style( $parent_style, get_template_directory_uri() . ‘/style.css’ );
wp_enqueue_style( ‘child-style’,
get_stylesheet_directory_uri() . ‘/style.css’,
array( $parent_style ),
wp_get_theme()->get(‘Version’)
);
}
add_action( ‘wp_enqueue_scripts’, ‘child_theme_enqueue_styles’ );
This code lets WordPress know to go to the parent theme and use the styles that are listed there for the child theme.
[Also Read: 12 Ways to Accelerate your WordPress Speed and Performance in 2021]
Step 5: Activate the Child Theme
It’s time to activate the child theme.
But first, take a screenshot that is to be featured on the WordPress backend.
As we did in the previous phase, create a zip file containing all the necessary items and upload it to WordPress
After that, you’ll be able to adjust the design that resembles your original HTML.
3. Import your content from HTML into WordPress using a plugin
This strategy can only be used if you’re willing to change the look of your website. If you want a completely new design, WordPress plugins can be a much seamless way to work with.
Below are steps on how you can import your content from HTML into WordPress with the help of mere plugins.
Step 1: Set Up a New Site
Startup your new site and install the WordPress theme of your choice. Make sure it’s a template that you like and can be easily edited. You will need to change the appearance to match your branding.
Step 2: Install the Plugin
Now, it’s time to install the plugin that allows you to do this. You’ll look for and install a WordPress Plugin named HTML import 2 on your site.
After that, activate it by clicking on install now.
Step 3: Upload Pages
Upload your pages to the same server as your WordPress installation once the plugin is installed.
Enter the following information under the files tab:
- Import Directory – This is the location where you copied your existing HTML code
- The old site URL – Enter the old URL of the site. It is largely there to serve as a redirect
- Default File – Enter your index.html
- File extensions to include – Add extensions of the files that will be imported
- Directories to exclude – Everything contained in the old site needs to be excluded that you don’t need
- Preserve file names – The plugin will by default use the name of the file as the new URL
After that navigate to the content tab and configure the HTML tag that carries the content of your site.
You’ll need to get used to the following tabs:
- You’ll inform the plugin how your titles are on the HTML template.
- The data that has to be imported into custom fields goes in the custom fields tab.
- Now, assign categories to the imported content on the categories and tags tab,
- The tools screen is where you may learn about some of the extension’s built-in tools.
Save your settings, and click Import Files after you’ve gone through each tab
Conclusion: Which method is better to convert HTML to WordPress website!
You can select any of the ways to convert your HTML website, depending upon your requirements and the state your website is in.
After reading the article and understanding the preceding solutions, you must have gotten a fair idea about how to convert an HTML website into a WordPress one and how WordPress all-in-all works. From here on, you can stretch your wings and develop a highly functional and feature-rich website through WordPress development services.
FAQs
A quick and easy way to transform your HTML into WordPress is as follows:
– To begin, create a new directory just for the theme.
– The styles.css file contains CSS code, which you may copy.
– Break up the HTML into separate files for the header, sidebar, and footer.
– To make header.php and footer.php compatible with WordPress, you must convert them.
So, let’s learn how to customize the HTML for specific pages and articles.
– Access the WordPress Control Panel
– Activate the Block Creator.
– Choose the Add block option.
– To use your formatting, such as HTML, choose Custom from the Formatting menu.
– Simply copy and paste your HTML code into the text box.
– Choose the Preview tab to get a preview of the code.
To use the material on your WordPress site, just copy the HTML code and paste it in. You may either use already material or start from scratch and develop the HTML code yourself. Simply save your HTML file and then import it into WordPress.
Quickly and easily transform any website into a WordPress theme. If you have HTML assets, you may simply submit them to a website and obtain your WordPress theme at no cost.
– Completely code-free automatic conversion.
– You may examine the converted version of your theme for free.
– It’s compatible with any site that uses HTML.
– Use any HTML editor or framework you choose to design a theme for WordPress.
How to get your WordPress site verified in the Google search console
– Get yourself over to Google’s Search Console.
– Register the Home in the Search Console.
– Get the HTML File for Verifying Ownership Here.
– Send the File Via FTP to Your Website.
– Reload the Search Console and hit the “Verify” button.

Related Articles
-
 WordPress is the Best CMS for SEO – Yes or No?
As more and more people are trying to make their presence known to the online world, be it mere blogging or getting a business started, one might wonder how and
-
 Benefits of Using Professional WordPress Page Speed Optimization Service
How long does your WordPress page take to load? Is it more than 3-4sec? If yes, then it’s a problem. The amount of traffic, leads, and conversions you receive and
-
Critical Data Protection Considerations On Your WordPress Website
WordPress design and development services in the contemporary digital age has been democratized by the use of WordPress, which has made the process of creating a website much easier and