Building Cross-Platform Mobile Apps with React Native: A Complete Guide
-

Maharshi Pancholi

Think about the last time you downloaded an app. Was it built for iOS or Android? Probably not. Users expect seamless experiences regardless of their device, and that’s precisely where cross-platform mobile development shines. If you’re a developer or business owner looking to create an app that works flawlessly on iOS and Android without doubling your workload, React Native is your best bet.
In this guide, we’ll take you through everything you need to know about cross-platform mobile development using React Native—from setting up your development environment to deploying your app on the App Store and Google Play.
What is React Native?
React Native is an open-source framework created by Facebook that allows developers to build mobile apps development company using JavaScript and React. Unlike traditional hybrid frameworks that rely on WebView components, React Native renders components using native APIs, offering a near-native experience while still enabling code reuse across platforms.
Core Concepts and Features of React Native

Component-Based Architecture
React Native follows a modular approach similar to React, allowing developers to create reusable UI components. These self-contained components simplify development, making managing, scaling, and maintaining applications easier while promoting code efficiency.
JSX (JavaScript XML)
JSX is an extension of JavaScript that enables developers to write UI elements using syntax similar to HTML. This declarative approach improves code readability, simplifies UI structuring, and enhances maintainability by making component hierarchies more intuitive.
Virtual DOM for Optimized Performance
React Native efficiently manages UI updates by leveraging a virtual DOM. Instead of modifying the actual DOM directly, it updates a virtual representation first, reducing unnecessary re-renders and improving app responsiveness.

The JavaScript-Native Bridge
A unique feature of React Native is its bridge, which facilitates communication between JavaScript and native modules. This allows seamless integration of JavaScript logic with device-specific features, enabling applications to take full advantage of hardware capabilities.
Native Modules for Enhanced Functionality
While React Native offers a rich set of built-in functionalities, developers can extend its capabilities by writing native modules in Objective-C, Swift (for iOS), or Java/Kotlin (for Android). This enables direct access to device-specific APIs, unlocking advanced features like camera integration, GPS tracking, and biometric authentication.
Hot Reloading for Efficient Development
Hot reloading is a game-changer in React Native. It allows developers to instantly see the impact of their code changes without restarting the entire application. This feature accelerates development cycles, enhances debugging efficiency, and streamlines testing.
Thriving Community and Ecosystem
React Native enjoys widespread adoption and support from a vast developer community. This active ecosystem provides many third-party libraries, frameworks, and tools that simplify development, accelerate problem-solving, and offer extensive learning resources.
Read More – Next.js vs. React: An In-Depth Comparison for Modern Web Development
Key Advantages of React Native
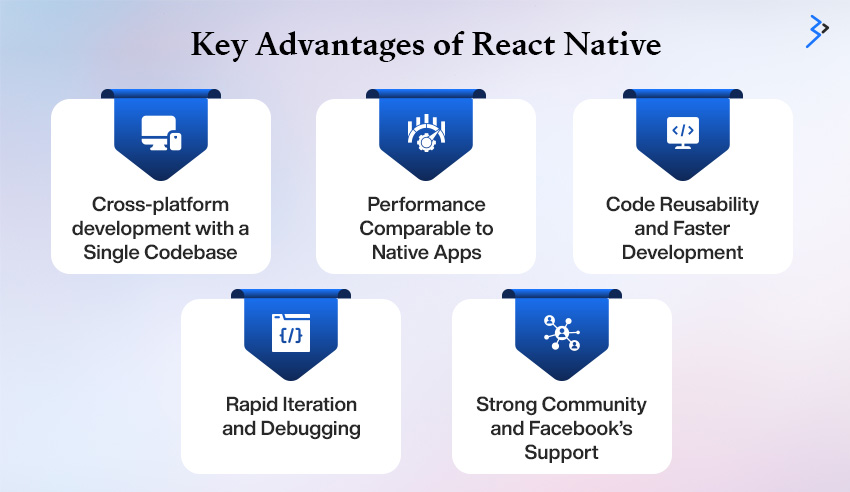
Cross-platform development with a Single Codebase
React Native eliminates the need for separate codebases for iOS and Android. Developers can write once and deploy across multiple platforms, reducing development time, effort, and cost while ensuring a consistent user experience.
Performance Comparable to Native Apps
Unlike hybrid frameworks that rely on web views, React Native compiles into native code. This approach ensures smooth animations, fast load times, and responsive user interactions, making the app feel native.
Code Reusability and Faster Development
Developers can reuse code components across different platforms, significantly reducing redundancy and accelerating development. Shared logic minimizes inconsistencies, enhances maintainability, and improves overall project efficiency.
Rapid Iteration and Debugging
Thanks to hot reloading, developers can make real-time changes to the app’s UI and logic without lengthy compilation processes. This feature streamlines debugging, testing, and feature implementation, leading to faster iterations and quicker deployment.
Strong Community and Facebook’s Support
Backed by Facebook, React Native continuously evolves with updates, optimizations, and feature enhancements. The robust community ensures long-term support, troubleshooting assistance, and a vast repository of plugins and tools for seamless integration.
Read More – A Comprehensive Guide to React vs React Native
Considerations When Choosing React Native

Initial Learning Curve
Transitioning to React Native is relatively smooth for developers who are already familiar with JavaScript and React. However, those new to these technologies may face a learning curve. Investing time in training and practice can help bridge the gap.
Working with Native Modules
While React Native provides access to many native functionalities, some advanced features require writing custom native modules. This may necessitate knowledge of Objective-C, Swift, Java, or Kotlin, adding complexity to the development process.
Performance Optimization Needs
Although React Native delivers near-native performance, poorly optimized applications can experience slow rendering or memory issues. Using FlatList for large datasets, optimizing image assets, and minimizing unnecessary re-renders can significantly enhance performance.
Why Choose React Native for Cross-Platform Development?
Single Codebase
Develop for both Android and iOS with a single set of code, significantly reducing development time and effort. This unified approach minimizes maintenance costs and simplifies debugging.
Fast Performance
React Native utilizes native components instead of web-based views, ensuring smooth and efficient performance. By bridging JavaScript with native code, apps achieve near-native speed and responsiveness.
Live and Hot Reloading
React Native supports live and hot reloading, allowing developers to see changes instantly without recompiling the entire app. This speeds up the development cycle and enhances productivity.
Large Developer Community
Backed by Facebook and a vast community, React Native enjoys continuous improvements, firm support, and a rich ecosystem of third-party libraries, plugins, and tools that enhance app functionality.
Cost-Effective Development
By leveraging a shared codebase, businesses save on development and maintenance costs. There’s no need to hire separate teams for iOS and Android, making React Native a budget-friendly option for startups and enterprises alike.
Rich UI Components
React Native provides pre-built and customizable UI components that help create visually appealing and highly interactive user interfaces, ensuring a seamless user experience across devices.
Seamless Third-Party Integrations
It allows easy integration with third-party plugins and APIs, enhancing app capabilities such as
maps, payment gateways, analytics, and more without extensive custom coding.
Strong Backing and Regular Updates
Maintained by Meta (formerly Facebook), React Native receives frequent updates, ensuring it stays in sync with the latest mobile development trends and platform changes.
Future-Proof Technology
With continuous adoption by major companies like Instagram, Airbnb, and Shopify, React Native remains a future-ready framework, ensuring long-term sustainability and reliability for app development.
Read More – Boosting App Performance: Top React Native Optimization Strategies
Setting Up Your React Native Development Environment
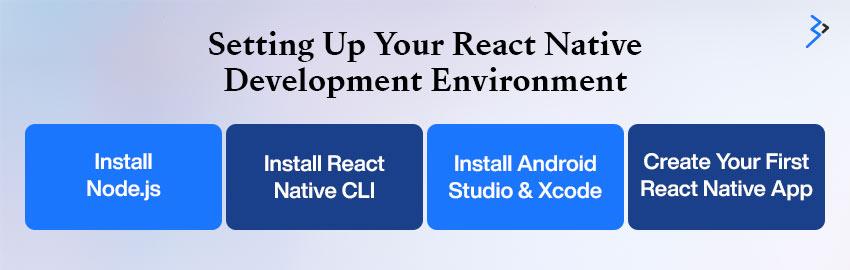
Before building mobile apps with React Native, you must set up your development environment correctly. Follow these steps for a smooth setup:
1. Install Node.js
React Native requires Node.js to run. You can download and install the latest stable version from the official Node.js website.
2. Install React Native CLI
The React Native CLI is essential for managing your projects. Open a terminal and run:
npm install -g react-native-cli
This installs the command-line interface globally on your machine.
3. Install Android Studio and Xcode
- For Android Development: Download Android Studio and set up the required SDKs.
- For iOS Development: Install Xcode from the Mac App Store. Ensure that Xcode Command Line Tools are installed by running:
- Xcode-select –install
- Note: iOS development requires a Mac.
4. Create Your First React Native App
Once your environment is set up, you can create a new React Native App Development Services project using the following command:
px react-native init MyFirstApp
Navigate to your project directory:
cd MyFirstApp
Run the app on an emulator or connected device:
px react-native run-android # For Android
px react-native run-ios # For iOS
Building the User Interface in React Native
React Native provides a rich set of core components to build your UI. Some essential components include:
- <View>: A container for UI elements, similar to <div> in web development.
- < Text>: Used to display Text.
- <Button>: A simple button component.
- <Image>: Used for rendering images.
Example: A Simple React Native App
import React from ‘react’;
import { View, Text, Button } from ‘react-native’;
const App = () => {
return (
<View style={{ flex: 1, justify-content: ‘center,’ align-items: ‘center’ }}>
<Text>Hello, React Native!</Text>
<Button title=”Click Me” onPress={() => alert(‘Button Pressed!’)} />
</View>
);
};
export default App;
Managing State and Data in React Native

Managing the state efficiently is crucial in React Native apps. Here are some commonly used methods:
1. Using state Hook
React’s built-in useState Hook is perfect for managing component-level state.
Example: A Simple Counter
import React, { useState } from ‘react’;
import { View, Text, Button } from ‘react-native’;
const Counter = () => {
const [count, setCount] = estate(0);
return (
<View>
<Text>Count: {count}</Text>
<Button title=”Increase” onPress={() => set count(count + 1)} />
</View>
);
};
export default Counter;
2. Using Redux for Complex State Management
Redux is ideal for managing global state in large applications.
3. Using Context API for Lightweight Global State
For apps that need simple state sharing across components, the Context API is an efficient alternative to Redux.
Optimizing Performance in React Native
React Native apps can slow down if not optimized properly. Follow these best practices to enhance performance:
1. Use FlatList for Large Lists
- Instead of rendering all items at once, FlatList efficiently loads and unloads items as needed.
import { FlatList, Text } from ‘react-native’;
const data = [{ key: ‘Item 1’ }, { key: ‘Item 2’ }, { key: ‘Item 3’ }];
const MyList = () => (
<FlatList
data={data}
renderItem={({ item }) => <Text>{item.key}</Text>}
/>
);
2. Avoid Unnecessary Re-renders
- Use React. Memo or PureComponent to prevent unnecessary component updates.
- Example:
import React, { memo } from ‘react’;
import { Text } from ‘react-native’;
const MyComponent = memo(({ text }) => <Text>{text}</Text>);
3. Optimize Images
- Use optimized image formats (WebP, JPEG) to reduce app size.
- Example:
<Image source={{ uri: ‘https://example.com/image.jpg’ }} style={{ width: 100, height: 100 }} />
4. Use Native Modules for Performance-Intensive Tasks
For tasks like heavy calculations or animations, native modules perform better than
JavaScript-based solutions.
Deploying Your React Native App
Once your app is ready, you can publish it to app stores.
For Android:
- Generate a release APK:
- cd android && ./gradlew assembleRelease
- Upload the APK to Google Play Console.
For iOS:
- Archive the project using Xcode.
- Upload it to the App Store using Transporter or Xcode.
Real-World Examples of React Native Apps
Many big brands use React Native, proving its capabilities:
- Facebook (parts of the mobile app)
- Instagram (adopted React Native for some features)
- Tesla (uses React Native for its mobile control app)
Read More – Building Your First React Native App: A Step-by-Step Guide
Conclusion
React Native simplifies cross-platform mobile development by allowing developers to write once and deploy everywhere. With a rich ecosystem, strong community support, and powerful performance, it’s no wonder that top companies rely on it. Whether you’re just starting or looking to refine your skills, React Native is a solid choice for building high-quality mobile applications.
Ready to build your next mobile app?
Brainvire’s expert developers can help you create cutting-edge, scalable, high-performance React Native apps. Let’s talk!

Related Articles
-
 Android Vs. iPhone – For Healthcare Industry
iPhone and Android are the two most popular operating systems used today. Each of them is constantly trying to leave no stone unturned both in terms of the end-user and
-
The Best & Affordable Tools for Mobile Game Development
It is evident that the entire population today own a smartphone which has indeed given a rise in mobile game development. There are multiple no. of mobile games that one
-
 Creating The Next Netflix! Tips & Tricks For OTT App Development
Over-the-top (OTT) refers to the delivery of video and audio material over the Internet without the involvement of a traditional cable or satellite provider. OTT App development has become a